An alphabet lesson, right to left · Grades K–5, in two tracks
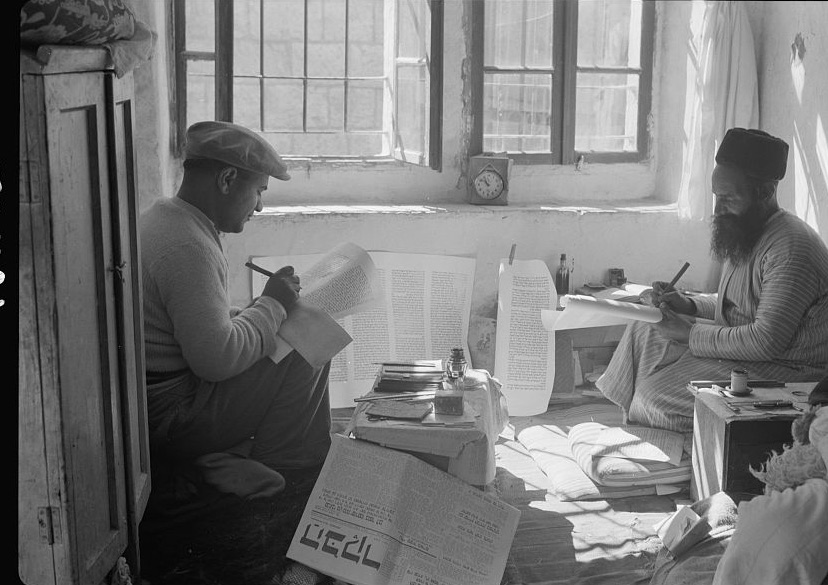
Yemenite Torah scribes, father and son, c. 1934–1939, writing with the same twenty-two letters the children will write today. G. Eric and Edith Matson Photograph Collection, Library of Congress.
Grade band
Grades K–5 (a K–2 track and a 3–5 track)
Lesson length
35 minutes (K–2) · 40 minutes (3–5)
Format
Picture study · letter tracing · write your name · a class scroll
Materials
The Alef-Bet tracing sheet and Your Name in Hebrew Letters chart (one each per child) · pencils · crayons · a long strip of paper for the class scroll · tape · scissors (grades 1–5; pre-cut for K)
An alphabet lesson, the kind a class runs for Chinese characters or Arabic script. Letters and names only; no words from any text.
Standards
World cultures · Language & literacy · NY K.2, 1.1, 2.2 (K–2); 3.4 (3–5) · NCSS Theme 1 (Culture) · C3 D2.Geo.2.K-2, D2.His.2.3-5 · Common Core RF.K–1.1 (print concepts, by contrast), L.K–5.4, SL.K–5.1
Public school
Taught as culture and history, the way a class studies any people’s writing. Children learn an alphabet and write their own names in it. Nobody writes, reads, or says any prayer, blessing, or sacred name; the lesson uses no Hebrew text, only the letters and the children’s names; the words-to-know card names the objects in the lesson.
Why this lesson, for the teacher
Nothing puts a culture in a child's hands like its alphabet. A class that has traced a few Chinese characters, or written its names in Arabic script, owns a small piece of that world forever. Hebrew has twenty-two letters, runs from right to left, and has been written with the same alphabet for about three thousand years. The scribe in the photograph is writing a scroll by hand with them, the way scribes still do; the same letters are on a street sign in Tel Aviv and on the cover of a picture book. A child who can write her own name in those letters has touched all of that at once. For the students, the lesson is simply: here is an alphabet that goes the other way, and here is your name in it.
The idea a child should leave with: a language a whole people kept for thousands of years, and I can write my name in it.
What this lesson teaches
Students learn that Hebrew is written with twenty-two letters from right to left, that its letters are very old and still in daily use, and that they can write their own name in it. By the end, a K–2 student can trace five letters and find the letters of their name; a 3–5 student can write their full first name, sound out a partner's, and explain why the vowels are mostly missing.
Core understandings
Hebrew has twenty-two letters, and there are no capital letters.
It is written and read from right to left. A Hebrew book opens from what an English reader would call the back.
The letters are mostly consonants. Vowels are small dots and dashes placed under or beside a letter; children's books and printed Bibles use them; a Torah scroll and a street sign do not. A Hebrew reader fills the vowels in.
Five letters change shape at the end of a word (kaf, mem, nun, pey, and tsadi).
The letters are very old: Hebrew was first written about three thousand years ago, and scribes still copy the Torah scroll by hand in the same alphabet.
A surprise for the older band: the letters also stand for numbers (alef is 1, bet is 2, and so on), which is how dates are often written on a Jewish calendar.
The two printables
The Alef-Bet (tracing sheet): all twenty-two letters, large and light grey to trace, laid out right to left with each letter's name and sound, the five end-of-word forms, and the number each letter stands for.
Your Name in Hebrew Letters (chart and name card): a sound-to-letter chart, six worked examples, a writing box with the start marked at the right edge, and a cut-out name card for the class scroll. The chart is honest about what it is: an approximation close enough that a Hebrew reader could sound the name out.
Suggested lesson flow
K–2 track 35 minutes
1 · Which way is he writing? (5 min)
Project the photograph at the top of this guide, or hold it up.
"These two are writing a very long scroll by hand, one letter at a time. Look at the father's hand. Which way do you think the writing goes across the page?"
Take guesses, then the reveal: "Hebrew goes from right to left. Each line starts on the side where our lines end." Hold up any picture book and open it from the back: "A Hebrew book opens this way too." Then: "This alphabet is about three thousand years old, and these letter shapes have been used for more than two thousand. Today you are going to write your name with them."
2 · Meet five letters (7 min)
Hand out The Alef-Bet. Say the first five names together, pointing from the right: alef, bet, gimel, dalet, hey. Children trace each one with a finger first, then with a pencil, starting at the right edge of the row. Kindergarten traces the five; grades 1 and 2 keep going down the sheet as time allows.
3 · Your name (15 min)
Hand out Your Name in Hebrew Letters. K: before class, or at the table, an adult writes each child's name in Hebrew letters lightly in pencil in the big box, using the chart; the child traces it and colors the card. Grades 1–2: children say their name slowly, count the sounds, find each sound in the chart, and write the letters themselves, starting at the arrow on the right. A helper checks the final-form letters. The vowels mostly stay out, "the way a scroll leaves them out," and children who want the dots can add them from the chart.
4 · The class scroll (5 min)
Each child cuts or tears off the name card at the bottom of the sheet (K: pre-cut). Tape the cards onto the long strip of paper in a line, the first card at the right end. Then the class reads its own scroll the Hebrew way, right to left, each child saying their name as the teacher's finger reaches it.
5 · Close (3 min)
"Look at the scroll we made. Now look at the scroll in the picture. Same letters. Those two scribes were using them ninety years ago. People have been writing this alphabet for three thousand years. And now you can write your name in it."
On the board: A language a whole people kept for thousands of years, and I can write my name in it.
3–5 track 40 minutes
1 · Which way, and the number surprise (6 min)
The photograph and the right-to-left reveal, as above, then the surprise: "Hebrew letters are also numbers. Alef is 1, bet is 2, gimel is 3, all the way up. Your sheet shows the number under each letter. Find the letter for your age." (Ten is yud; eleven is yud followed by alef, written right to left.) Thirty seconds, then hands up.
2 · Meet the letters (7 min)
Hand out The Alef-Bet. Read the twenty-two names across the rows, right to left, the class repeating each. Point out the five letters with a second shape for the end of a word, and the fact that there are no capitals. Children trace the full sheet.
3 · Your name (15 min)
Hand out Your Name in Hebrew Letters. Children say their name slowly, count the sounds, find each sound in the chart, and write the letters in the box starting at the arrow on the right, using the end form for a final M, N, F, K, or TS sound. Read the honesty line on the sheet aloud: some English sounds have no Hebrew letter, so the chart gives the closest one, and a Hebrew reader could still sound the name out. Then swap papers: each child reads a partner's name from the Hebrew letters alone, right to left, and the partner says whether it was close.
4 · The class scroll (7 min)
Children cut off their name cards. Build the scroll on the long strip, first card at the right end, and read it together right to left. Grades 4 and 5: one child reads the whole scroll aloud from the Hebrew letters, then a second child checks.
5 · Close (5 min)
"Same letters as the scroll in the picture. Same letters as scrolls two thousand years old in museums. Same letters on a street sign in Tel Aviv this morning. A whole people kept this alphabet for three thousand years, in every country they lived in, and you just wrote your name in it."
On the board: A language a whole people kept for thousands of years, and I can write my name in it. If there is a minute left: "What other alphabets do you know that go a different way, or look different from ours?" (Arabic, Chinese characters, Korean, Greek, Cyrillic: any answer is a good one.)
Notes on teaching this well
It is an alphabet lesson. Teach it exactly as you would teach Chinese characters or Arabic script: letters, direction, your own name. The lesson uses no Hebrew text, only letters and names, and that is deliberate. Keep it that way.
Be honest about the chart. English has sounds Hebrew does not write with one letter (th, w, the English j). The chart gives the closest letter and says so. "Close enough to sound out" is the truth and children accept it happily.
Start at the right. The single most common mistake is writing the first letter at the left. The arrow on the sheet is there for that reason; point to it before anyone writes.
Children who already write Hebrew. A child who learned Hebrew at home or at a religious school may know the letters. Let them help at their table, and let them show their name written the way they learned it, which may differ from the chart. Both are right.
Left-handed children often find right-to-left writing easier than their classmates do. Say so; it is a good moment for them.
Follow-up & pairing
Words that traveled:Stories, Foods, and Words has the English words that came from Hebrew and Yiddish; the children have now seen the letters those words were first written in.
The language that woke up:One People, Many Faces (3–5 track) reads The Language of Angels by Richard Michelson (Charlesbridge, 2017), the story of the first child in many centuries to grow up speaking Hebrew.
Real manuscripts: the National Library of Israel's online treasures gallery (linked on the K–5 page under Theme 2) shows Hebrew manuscripts centuries old, in the same letters, good for projecting.
At home. This lesson works at a kitchen table with one child. Skip the parts built for a whole room and do the part you would enjoy together; the words-to-know card ends with a note for families.
Tell us how it went. One sentence to education@makorproject.org about what worked and what did not helps the next teacher who opens this lesson.
Sources & further reading (for the teacher)
Omniglot · Hebrew language, alphabet and pronunciation: the twenty-two consonants, right-to-left direction, the five final forms, vowel marks ("not usually marked, except in the Bible, poetry and books for children and foreign learners"), letters used as numbers in some circumstances, and the first written Hebrew in the 10th century BCE.
The name chart is a teaching approximation. Hebrew spellings of English names vary from family to family; present the chart as "one good way," not the only way.
 K–5 Lesson